Friday, January 29, 2010

How to: create a TopBraid Ensemble application

An updated version of this blog post is now available as a chapter in the TopBraid Application Development Quickstart Guide (pdf).

TopBraid Ensemble (TBE) is a Flex-based web application for assembling and displaying TopBraid applications. The user interface runs on web browsers with Adobe Flash installed. When developing applications, the data behind the application is hosted by the TopBraid Live Personal Server included with TopBraid Composer Maestro Edition (TBC-ME); applications can then be deployed for multi-user use on a server running the TopBraid Live Enterprise Server product.

Today we're going to see how to use TBE to create an editor that lets an end user edit a thesaurus using the SKOS vocabulary management ontology. This exercise is excerpted from the TopBraid Ensemble Application Development and Reference Guide (pdf), which you can download and use to find more detailed background on TBE's features and architecture.

TopBraid Ensemble: the basics

TBE lets developers quickly configure applications around semantic web models by:

  • Assembling pre-packaged graphical user interface components such as search forms and tree-based displays into desired configurations that let the end user view or edit data

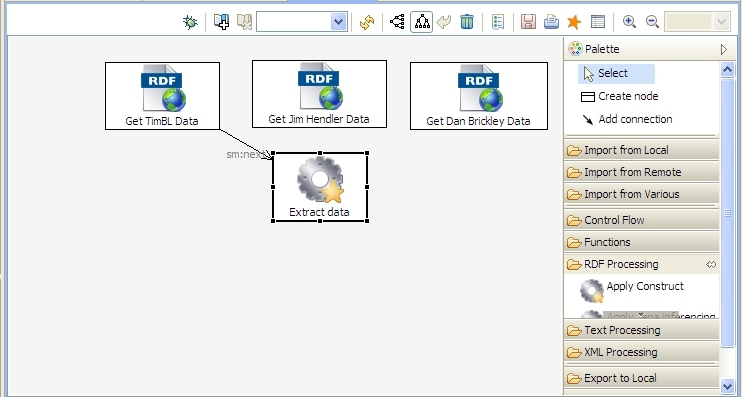
  • Adding custom business actions through SPARQLMotion scripts

  • Building and using new custom components

Once the application developer designs forms and event logic around a data model and deploys this TBE application on a server running the Enterprise edition of TopBraid Live, the developer's end users can use this application with any web browser that supports Adobe Flash.

The nine user interface component types offered in release 3.2 include trees, grids, forms and maps. A developer can arrange these across multiple pages that function like a tabbed interface to reduce the clutter than can result from squeezing too much onto a single screen.

Each UI component can:

  • Contain one or more widgets that can display or provide an edit mode for information from the connected information source

  • Include its own menu actions and icons

  • Broadcast events to other components and listen for and react to events broadcast by other components

TBE also provides non-UI, or invisible components, which work behind the scenes to perform data transformation and to relay events.

A developer designs one or more input screens with TBE components and specifies the data graph that it will work with. These applications can call SPARQLMotion scripts, combining sophisticated back-end triples processing with quick development of application user interfaces to create powerful, intuitive semantic web applications.

Creating an application consists of four basic steps:

  1. Select whether you want to begin with a New Application or a Default Application

  2. Identify the data to use with your application

  3. Select and configure the components to go on your screens

  4. Test your application

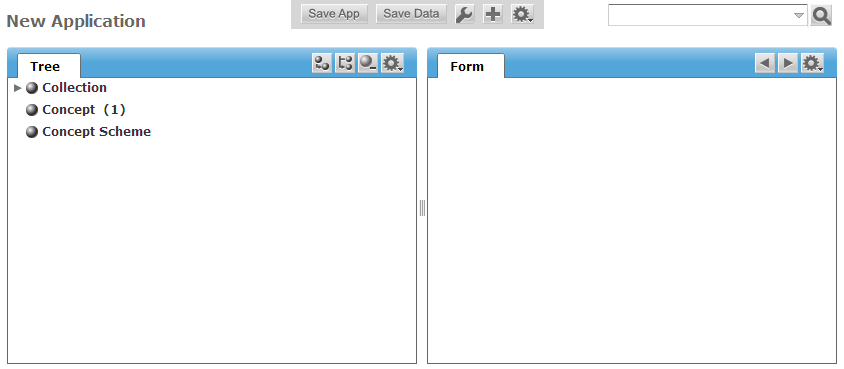
Starting with a New Application means starting with a blank form and then adding and configuring the components that you need. This is especially useful for experienced TBE developers creating simple applications. New TBE developers often find it easier to begin with a Default Application, which includes several components arranged in a default layout that you can modify by deleting, adding, moving, and reconfiguring the components.

The following shows a Default Application before any modifications have been made, with kennedyfamily.owl specified as the data to use with it:

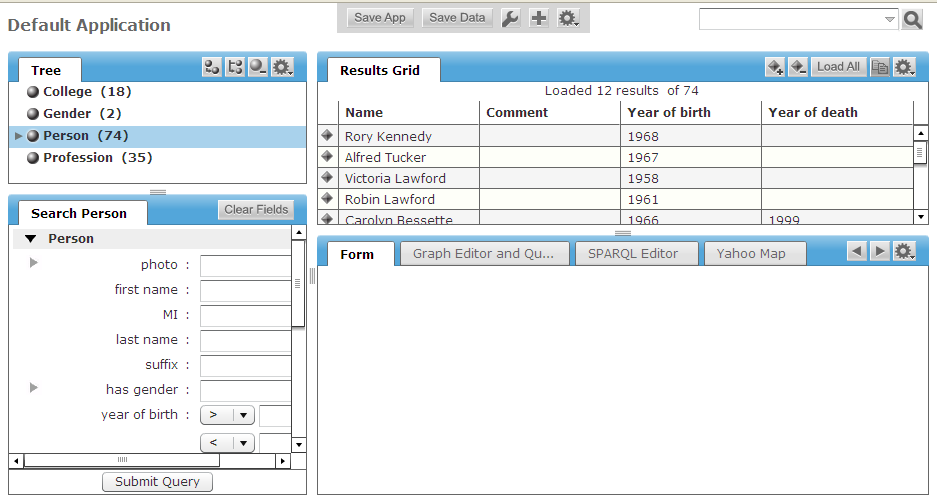
A configured TBE application specifies what components are shown when it is launched, how components are arranged, and how they interact with each other. Each application also defines what data to use with it. Some applications, such as the default apps and the new app, are configured to work with any data. Other applications are configured to work with specific datasets.

When creating a TBE application, components can be rearranged, resized, removed and added. For example, you can have have two Results Grid components on the screen instead of one, like the default applications have. You can also customize the menu options for each component and the way the components interact with each other.

TopBraid Ensemble's Default configurations are general TBE applications included in your installation. These configurations include most of the built-in components, laid out and wired for interaction with each other so that when an event such as a resource selection happens in one component, information displayed in some of the other components changes. For example, when you select a class in the tree, the members of the class appear in the grid, and when you select a resource in the grid, it populates the form with information about that resource.

You can learn a lot about the potential power of these forms by studying how the components in the default configurations generate and listen to the events that make this kind of component interaction possible.

Creating the sample application

Our sample SKOS thesaurus editing application will have only two components:

  • A tree displaying resources connected by skos:broader property.

  • A form showing details of each resource. When the end-user clicks a node of the tree or a class name on the form, the form will refresh to display all the details about that class.

TBE applications typically work with ontologies created using TBC, so before creating our TBE app, we need to create the data model.

Step 1: Create Ontology

In TBC, create a new RDF/OWL file called thes1 and import skos-core.rdf from the Common folder of the TopBraid library into your new model. Create an instance of skos:Concept (a subclass of owl:Thing) in this model and call it Taxonomy Root. Remember which project it's stored in; we will need it as a root resource for the tree created on your TBE form.

Save your work.

Step 2: Create New Application

To get started with developing and configuring a TBE application, first send your browser to the TopBraid Suite Console, which can be accessed at http://localhost:8083/tbl when running the TopBraid Live Personal Server included with TBC Maestro Edition. This will take you to the TopBraid Administration Console.

In the TBS Administration Console, select "New Application".

On the "Data Graphs Compatible With New Application" screen, select the thes1 model that you just created from the project where it was stored.

Step 3: Select Components

In TBE, click the plus sign icon and select Add Components to add each of two new components to the application: tree and form. Drag their tabs to lay them out side by side as shown in the following:

Note how the default configuration of the tree component is to show the class structure of the data model; you'll be reconfiguring it to show the tree of taxonomy terms being edited by your new application's end user.

Step 4: Configure Application

Launch the configuration console by clicking the wrench icon or pressing F2. You began with a copy of "New Application"; Click on "New Application" at the top of the navigation pane on the left, and then under General on the right change the application label to be "SKOS Editor". (Hover to the left of the existing value and click the "edit" button that appears there to change the value. )

Step 5: Configure Tree

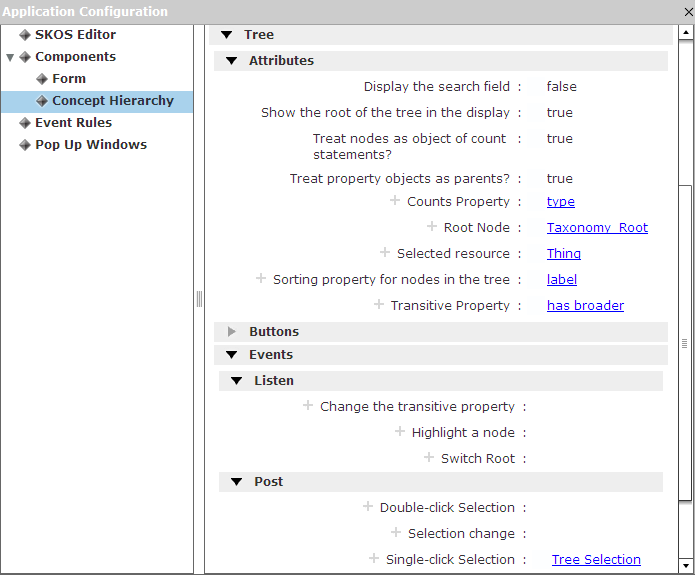
Now click on the Tree component on the left side of the Application Configuration console (you may need to first click the Components node of the tree to expand it into a list of available components) and make the following modifications:

  • Rename the Tree's label to read Concept Hierarchy.

  • Under Tree/Attributes, change the "Show the root of the tree in the display" setting to true.

  • Change the Root Node to the Taxonomy Root (the new resource you created in TBC).

  • Change the Transitive Property that identifies tree node child/parent relationships to "has broader" (the label assigned to the skos:broader property).

  • Under Events, create a new Post Event for Single-click Selection and call it Tree Selection.

Your configuration should look similar to the one shown here:

Step 6: Configure Form

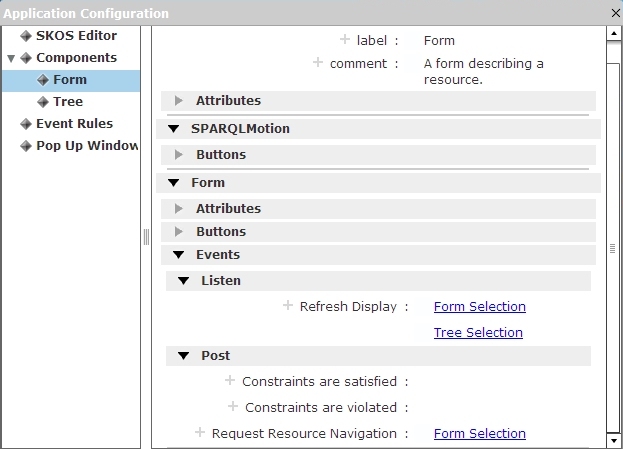
Now select the Form component on the left of the Application Configuration console and make the following modifications:

  • Wire the Form to listen to the Tree Selection event. Click on Add existing entry next to Refresh Display (Listen Event) and start typing "Tree". When "Tree Selection" shows up in the drop down, select it and click OK.

  • Create a new Post Event for the Request Resource Navigation listener. Call it Form Selection.

  • The form is already configured to refresh when the end user clicks on a tree node, which sends a Tree Selection event. You also want the form to refresh if the end user clicks on the name of a concept on the currently displayed form. For example, if the form for the concept Sparrow shows that Sparrow's broader term is Bird, and the end user clicks on Bird, you want it to display data for the concept Bird. Click on Add existing entry next to the Refresh Display listen even and start typing Form. When "Form Selection" shows up in the drop down list, select it. It will join Tree Selection as the second value for the Tree's Refresh Display listen event.

Your configuration should look similar to the one shown here:

Step 7: Test and Save

Your new application is done.

You can close the configuration console by clicking the X at the upper right and test your new application by creating new nodes in the tree with the buttons in the upper-right of the tree component and entering additional information in the forms as shown here:

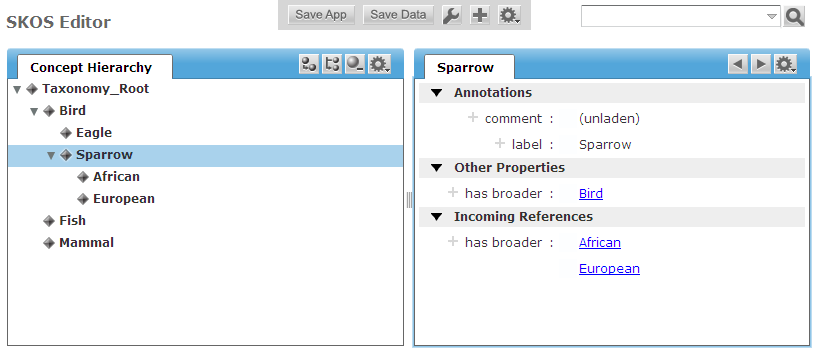
As you add and select nodes in the Concept Hierarchy, the tab title and many of the fields in the form on the right will update automatically to provide information about the selected tree node.

To save your application, click the Save App button. On the Save Application As dialog box, enter new values for Application Name and Application Base URI. (If this is not the first time you've saved this application, you'll also want to click the Overwrite check box.) The next time you go to the TopBraid Suite Console, you'll see your new application listed where you earlier saw New Application, Default Application, and the other choices.

To save the data you've created using your new editor, such as the bird information shown in the screen shots, you or your application's end users would click the Save Data button.

Applications like this can be hosted on the TopBraid Live server, where any users with browser access to that server can run your application and browse and edit the data you choose to make available. They don't need TopBraid Composer, and they don't need to know about RDF or any data modeling issues; they only need to know how to use the graphical, interactive application that you design for them using TopBraid Ensemble.

So far, we've only seen a small part of what a TBE application can do for your end users. Take a look at the TopBraid Ensemble Application Development and Reference Guide (pdf) to learn more.

Friday, January 22, 2010

How to: create and run a semantic web service

An updated version of this blog post is now available as a chapter in the TopBraid Application Development Quickstart Guide (pdf).

When you know how to define a new function and create a SPARQLMotion script in TopBraid Composer, you can put these two skills together to create a RESTful web service that can be called from any computer with HTTP access to the server running your web service. In a production environment where many people and systems might call your web service, TopBraid Live would be the best way to host it, but for developing and testing you can use the HTTP server built into TopBraid Composer Maestro Edition. Today we're going to see how to create a web service that searches the database about the Kennedy family included with TopBraid Composer and returns RDF/XML that lists everyone with a particular first name.

But first, what makes this a "semantic" web service? TopBraid Composer puts all the power of semantic web technology, such as SPARQL, OWL, and more, behind your development efforts, and it lets you read and write both semantic web data formats and more traditional ones. By delivering RDF, your web service can plug into other semantic web applications, although you're certainly not limited to RDF as a delivery format—you can deliver XML, a spreadsheet, or even HTML, so that a browser hitting the URI you designate for your service would actually be displaying a dynamically generated web page.

If you've never defined your own functions or created a SPARQLMotion script in TopBraid Composer, you'll want to review the earlier entries How to: write new SPARQL functions with SPIN and How to: create and run a SPARQLMotion script before continuing.

Creating your script

Start by creating a SPARQLMotion File, but on the Create SPARQLMotion File dialog box, remember to check the "Script will declare (Web) Services or Functions (.sms extension)" checkbox. If you name your file ws1, you'll see that TopBraid Composer then saves it with the full name ws1.sms.n3.

Once you've created this file, turning it into a web service script involves two steps:

  1. Defining the function that the web service URI will call.
  2. Defining the script that will be triggered by the function call.

Defining the function to call

Create a new subclass of spin:Functions and name it searchKennedys. Add an sp:arg1 argument as a spin:constraint value using "Create from SPIN template" (as described in How to: write new SPARQL functions with SPIN) with a predicate value of sp:arg1. For the argument's comment field, enter "String to search for." Also, set its valueType to xsd:string so that the function receiving the passed argument value knows to treat it as a string and not as a URI. With that, you'll be finished configuring your spl:Argument and can click the OK button.

A given SPARQLMotion script can have several possible endpoints return different variations on how the data is processed, so identifying a set of script modules to run means identifying a specific endpoint in a script. On the class form for your new searchKennedys function, set the sm:returnModule property by clicking the white triangle to display its context menu and then selecting "Create and add..." You will create this return module before adding it because you haven't created your script yet, so there's no endpoint module to point to.

On the Create and add dialog box, pick sml:ReturnRDF as the first module to add, as shown below. (It's a subclass of ExportToRemoteModules because your web service will return its results to a remote caller; you'd pick something from ExportToLocalModules if it were going to save the results in a local file.) Name your new module ReturnSearchResults.

Click the OK button.

Creating the SPARQLMotion script

Next, select "Edit SPARQLMotion script" from the Scripts menu. You'll see that two modules have already been added to your new script: your ReturnSearchResults module and an Argument module to represent the arg1 argument being passed to your script.

Note the gray "arg1" with a little arrow on a circle in the lower-right of the Argument module, which shows the name of the variable that's being set and passed along from it. Your script will use this variable to specify what to search for in the Kennedy family data.

The next step is to add something to the script to read the data that it will search. Drag an Import RDF from Workspace icon from the Import from Local section of the palette onto the workspace and name it GetKennedysData. To configure it, double-click its icon, set its sml:sourceFilePath property to /TopBraid/Examples/kennedys.owl, and then click the Edit GetKennedyData dialog box's Close button.

Now we'll add the module that searches through the data and extracts the subset that we need. Drag an Apply Construct module from the palette's RDF Processing section onto the workspace and name it SelectData. Set its sml:replace property to True so that it only passes along the selected data and not the input data as well. Set the sml:constructQuery value to the following:

PREFIX k: <http://topbraid.org/examples/kennedys#>
CONSTRUCT {
?s k:firstName ?first .
?s k:lastName ?last .
}
WHERE {
?s k:firstName ?first .
?s k:lastName ?last .
FILTER regex(?first, ?arg1, "i" )
}

(After you press Enter, TopBraid Composer will replace the "k" namespace prefixes with the namespace URIs.) If you wanted this query to always search for firstName values with "John" in them, you could put that as the second argument of the regex function, but this query has something more flexible: a reference to the arg1 variable that will be passed in from the Argument module. (The third argument of "i" to this function tells it to ignore case when searching.) The use of the regex function means that it will search for substring matches as well, so that a search for "Car" will turn up Caroline Kennedy, Carolyn Bessete, and Cart Hood.

You're finished configuring this module, so click the Close button and connect the two input modules to it like this (don't worry about connecting up the Return Search Results module just yet, and remember that at any time you can drag the module icons around to make the script's flow easier to understand):

Select the SelectData module and then click the debug icon near the upper-left of the workspace to test it. Because no value has been passed for the Argument, a SPARQLMotion Script Input dialog box prompts you for one. Enter "jean" as a test, press Enter, and then click the Next button. When it's finished, you should see triples storing the firstName and lastName values for Jean Olssen, Jean Kennedy, and Jeannie Ripp appear in the SPARQLMotion Results view.

Your web service script can now do everything except return the data that it extracted from the data source to the process that called the service. Connect the Select data module to the Return search results module, which still needs one bit of configuration: to tell it to return the data as RDF/XML, double-click the icon and click the context menu for the sml:serialization property. Don't pick "Add empty row" this time; you want to add one of the predefined values from the sml:RDFSerialization class, so pick "Add Existing." On the Add existing dialog box, click on sml:RDFSerialization, select sml:RDFXML on the right (note the other choices available to you), click this dialog box's OK button, and then click the Edit ReturnSearchResults dialog box's Close button.

Save your work. The final script should look something like this:

Registering and calling your web service

Before something can tell TopBraid Live or the server built in to TopBraidComposer to call the searchKennedys function that calls this script, the function must be registered with the server. To do this, select "Refresh/Display SPARQLMotion functions..." from the Script menu, and after a few seconds you'll see the updated list of registered functions on the Console view.

To test your web service, enter the following into any web browser running on the same computer as your copy of TopBraid Composer; note how its two parameters identify the function to call and the argument value to pass to it:

http://localhost:8083/tbl/actions?action=sparqlmotion&id=searchKennedys&arg1=Rob

After making this call, you should see RDF/XML data in your web browser about the six people in the database who have "Rob" in their first name: five Roberts and a Robin. (For some browsers, you may need to to a View Source to see all the XML.)

Congratulations! You now have a working, RESTful, semantic web service up and running. Any tool that can send a URI to the HTTP server built into TopBraid Composer and then parse the result can use it. (Most modern program languages include libraries that make this simple.) If you install your web service and the appropriate data files on a computer running TopBraid Live, multiple systems can retrieve data from that service at once.

When you consider the possibilities of using data from more diverse, large-scale data sources and creating SPARQLMotion scripts that take advantage of a wider range of the modules available on the workspace palette, you'll start to see the tremendous possibilities of what you can do with your TopBraid semantic web services.

Thursday, January 14, 2010

How to: create and run a SPARQLMotion script

An updated version of this blog posting is now available as a chapter in the TopBraid Application Development Quickstart Guide (pdf).

SPARQLMotion is a visual scripting language that lets you tie together triples from diverse data sources (whether they're natively stored as triples or not), process them using SPARQL, and then save the results in a wide choice of output formats. One of these scripts can be run from TopBraid Composer, as a semantic web service, or as the back end to a user interface created with TopBraid Ensemble.

You create a SPARQLMotion script by dragging icons representing different kinds of modules from a palette onto a workspace and then filling out a dialog box for each to configure it. Here, we're going to look at the creation of a simple script, and in future entries on this blog we'll learn about more modules and what they can add to your application development: reading and writing spreadsheet data, reading and writing from large, disk-based triplestores, checking of data constraints, HTML and XML processing, and much more.

Our sample script will import the triples from the FOAF ("Friend of a Friend") files of some well-known semantic web advocates, extract the names and nicknames of their friends who are listed there, and save the results in a new RDF file. Much more complex scripts are possible, but the creation of those scripts will always follow the basic steps described here.

To create a SPARQLMotion file, create a new file in TopBraid Composer the same way you would create any other file. When you indicate that you want to create a file, you'll see that "SPARQLMotion File" is one of the options; picking it creates a file that already has the sparqlmotionfunctions and sparqlmotionlib libraries imported; these have what you need to add a script to your new file. Assign the file any Base URI and File name you like (for example, http://www.example.com/sm1 and sm1) and click the Finish button to indicate that you're done with the Create SPARQLMotion File dialog box.

Next, select "Create SPARQLMotion Script" from TopBraid Composer's Scripts menu. A Select initial module type dialog box will ask you about the first module to add to your script. Because the script will import RDF files from the web, start with an ImportRDFFromURL module and name it GetTimBLData:

After filling out the dialog box as shown and clicking the OK button, the script appears with its single module:

Double-click the icon representing the module to configure it. The only information you must add to an ImportRDFFromURL module is the URL of the RDF to import. To set the value of a property such as sml:url on one of these dialog boxes when there is no existing value, display its context menu by clicking the white triangle next to it and select Add Empty Row. To to set the property value to retrieve Tim Berners-Lee's FOAF file, enter the value http://www.w3.org/People/Berners-Lee/card.rdf, as shown below. (I've also tweaked the rdfs:label value, and note from the "Ok" to the right of the sm:url that the data entry of this field is not complete—TopBraid Composer will not know about this new value until you either press the Enter key with the cursor in that field or click on "Ok" to make it go away.)

We'll see shortly why you don't have to add a value for the sm:next property on this dialog box. Click the Close button to return to the script workspace.

At this point, your script only has one module, but you can still run it. Clicking a module icon selects it, and clicking the little bug icon ("Debug selected SPARQLMotion module") at the top of your workspace tells TopBraid Composer to run the script up to the selected module. Do this with GetTimBLData, and after it retrieves the triples from the designated URL, TopBraid Composer displays a message box offering to display the result triples in TopBraid Composer's SPARQLMotion Results view.

As with so many semantic web applications, this one becomes more interesting when you add more data sources and then select a subset of the combined data that meets your needs. If you don't see the module palette on the right side of the script workspace, click the small white triangle in the upper-right of the workspace to display it. To add a second module, click "Import from Remote" on the palette and click the small darker triangle to scroll through the choices there. When you see Import RDF from URL, add a new one of these modules to your workspace by dragging it there and name it GetJimHendlerData. Enter http://www.cs.umd.edu/~hendler/2003/foaf.rdf as the data's location. Then, add a third Import RDF from URL module named GetDanBrickleyData and set http://danbri.org/foaf.rdf as the sml:url value. (At any point in the creation and editing of your script modules, you can rearrange the icons by selecting and dragging them.)

Once the script retrieves data from these three sources, it will send it to a module that only passes along the triples that identify the name and nickname values found the source data. Drag an Apply Construct module from the RDF Processing section of the palette onto the workspace and name it ExtractData. After this module appears, double-click it and set the sml:constructQuery's value to the following:

CONSTRUCT {
?s a <http://xmlns.com/foaf/0.1/Person> .
?s <http://xmlns.com/foaf/0.1/name> ?name .
?s <http://xmlns.com/foaf/0.1/nick> ?nick .
}
WHERE {
?s <http://xmlns.com/foaf/0.1/name> ?name .
?s <http://xmlns.com/foaf/0.1/nick> ?nick .
}

You can use SPARQL CONSTRUCT queries to rearrange and cross-reference data to infer and create new information based on the input, but our simple query merely finds and passes along triples that match two patterns and declares that the subject that has these properties is a Person as defined by the FOAF vocabulary.

After entering this CONSTRUCT query, set the same dialog box's sml:replace value to True so that only the constructed triples get passed along to the output without the input data. Now you're finished with this dialog box, so click its Close button.

We haven't identified the input of this CONSTRUCT module yet. Instead of writing code, we can do it by just pointing and clicking. To make your first connection, select the Add connection icon on the Palette, click on the GetTimBLData module, and then click the ExtractData module. An arrow will appear to show that data will flow from one to the other when the script is run:

Follow the same steps to connect the other two data retrieval modules to ExtractData.

Instead of waiting until the application is finished to test it, we can do more incremental testing here. Select the ExtractData module, click the debug icon at the top, and you should end up with a list of names, nicknames, and foaf:Person type declarations in the SPARQLMotion Results view.

Our final step has two parts:

  1. Tell the script to save the results of the ExtractData module to an RDF file. From the Export to Local section of the Palette, drag an Export to RDF file module onto the workspace and call it SaveOutput. Double-click the new module and set the sml:baseURI property to http://mytest/ (or any URI you like; it will be used as the base URI of the saved file) and set sml:targetFilePath to sm1out.rdf. If you don't specify a path for this file, the SPARQLMotion script will save the file in the same directory as the script itself. After setting these two values, click the Close button.

  2. By including the FOAF ontology in your output, applications that read the file created by your script will have more context about the meaning of the data. You can import this ontology from the web, but the TopBraid Composer distribution includes many popular ontologies so that importing them will happen more quickly. From the Import from Local section of the SPARQLMotion palette, drag an Import RDF from workspace module onto the workspace and name it FOAFOntology. Double-click it, set its sml:sourceFilePath property to /TopBraid/Common/foaf.owl, press Enter, and then click the dialog box's Close button.

Use Add connection to connect the ExtractData and the FOAFOntology modules to the Save Output module. Your completed script should look like this:

After saving your application, test it by selecting the Save Output module and clicking the debug icon. As it runs, watch the Console view, which has informational messages about your script as it runs. This and the Error Log view are valuable for debugging complex scripts.

The script should create the sm1out.rdf file described above. Open it up, and then in TopBraid Composer's Classes view, drill down from owl:Thing to foaf:Agent and select foaf:Person so that the instances you've created appear in TopBraid Composer's Instances view. Selecting any of them there will display details about that person in the Form view, where you'll see the name and nickname assigned to that person somewhere on that form. (You may need to scroll down a bit to see those particular properties.)

If you look through the many module choices on the SPARQLMotion palette you'll get some idea of the wide variety of possibilities you have for the kinds of data that a script can read and write and the sophisticated options for processing that data. We'll look at many of them in future entries here. Meanwhile, take a look at this short video, which shows you how to create another simple script that uses a few more interesting modules.

Tuesday, January 5, 2010

How to: write new SPARQL functions with SPIN

An updated version of this blog post is now available as a chapter in the TopBraid Application Development Quickstart Guide (pdf).


This is the first of a series of short pieces on how to use various features of the TopBraid Suite application development tool set. For example, we'll see how to create a SPARQLMotion script, how to create a user interface with TopBraid Ensemble, how to create a web service, how to convert triples to XML and run an XSLT stylesheet on them, and how to use data from spreadsheets, databases, public SPARQL endpoints, and more. These postings will focus mostly on application development, and assume that you already know the basics of TopBraid Composer itself, which you can learn from the "TopBraid Composer Getting Started Guide" (pdf). Each posting will be assigned to the How to category of this blog to make it easier for readers to use them as a set.

This first entry shows how you can define your own functions using the SPARQL Inferencing Notation, because it's such an important building block for many of the techniques that we'll learn about in future entries. This material is excerpted from the "Getting Started with SPIN" (pdf) document, which is available for you to download. The complete "Getting Started with SPIN" document also covers inferencing, constructors, constraints, and more.

Before we cover the definition of new functions, let's review the calling of functions in TopBraid, because there are so many useful ones available to you.

Calling built-in functions

The "TopBraid SPARQLMotion Functions Library" page of TopBraid Composer's online help lists over 70 functions available for you to call from your applications, including string functions, mathematical functions, logical functions, and ontology functions. Because TopBraid Composer uses the Jena SPARQL engine, it supports the LET keyword for assignment of variables, which gives you a way to experiment with built-in variables using a short, simple SPARQL query.

For example, to try the mathematical function smf:random() (a TopBraid Composer extension to the Jena function library), enter the following query in the SPARQL view's Query Editor tab:

SELECT ?x
WHERE {
LET (?x := smf:random()).
}

To execute it, either click the "Execute SPARQL" green triangle button or press Ctrl+Enter, and you'll see a random number between 0 and 1 appear in the [x] column of the SPARQL query result. Because this function returns a different value each time you call it, go ahead and execute it a few more times.


Another built-in extension function is smf:parseDate(), which converts a string in a semi-structured date format into an xsd:date, xsd:dateTime, or xsd:time value. (To learn more about smf:random(), smf:parseDate(), and other available functions, select Help Contents from the Help menu and then TopBraid Composer -> Reference -> SPARQLMotion Functions Reference.) This function takes two parameters: a date string and a template showing which pieces of the date are where in that string. Try pasting the following query into the SPARQL

view and executing it:

SELECT ?x
WHERE {
LET (?x := smf:parseDate("12/3/09","MM/dd/yy")).
}

The value displayed under [x] is "2009-12-03". (The TopBraid Composer online help for this function includes the URL of a web page with greater detail about options for the format string in the smf:parseDate() function's second parameter.)

We're going build on this function to create a simpler function to convert dates in the MM/dd/yy format.

Defining your own functions

Before we use the SPIN vocabulary, we need to import it into our vocabulary. Open your Import

s view and drag the spin.owl file from the TopBraid/TBC folder in the Navigator view into the Import view. You'll see several new nodes appear in the Properties view, each with an sp: or spin: prefix and a plus sign next to it that expands the node to show the full range of SPIN properties. For now, you won't need to use these properties from this view, because TopBraid Composer gives you forms to fill out to specify everything you need to define a new function.

The Classes view also shows a few new classes. Click the plus sign next to spin:Modules to expand it, and you'll see that one of the subclasses is spin:Functions.

To create your new function,

  1. Right-click on spin:Functions and pick Create subclass from the context menu.

  2. On the "Create Classes" dialog box, click on the default new function name of "Functions_1", replace it with the name "mmddyy2ISO8601", and press Enter.

  3. Click the OK button. You'll see that your new subclass of spin:Functions is currently selected in the Classes view, and the class form will have the URI and rdfs:subClassOf values already filled out.


Your new function will have an argument passed to it: the date string to convert. The body of the function must reference this argument, so let's define the argument before creating the function body. Like everything else in SPIN, this definition will ultimately be stored with a series of triples, but because argument definition is so common in application development, SPIN includes a template to make it easier.

  1. SPIN models arguments to functions as constraints on those functions. On the mmddyy2ISO8601 class form, click the spin:constraint widget (the small white triangle to the right of the name "spin:constraint") and pick "Create from SPIN template".

  2. Select spl:Argument from the Available Ask/Construct Templates list, and then fill in the following two fields in the Arguments panel on the right of the "Create from SPIN template..." dialog box:

    • In the comment field, enter Convert mm/dd/yy formatted date to xsd:date type and format. (Remember to press the Enter key after entering a value on one of these forms. If you tab to another field and the comment field has a heavier border around it and and the "Create from SPIN template" dialog box's OK button is grayed out so that you can't click it, go back tot he comment field and press the Enter key.)

    • Instead of typing a value directly into the predicate field, click the plus sign to the right of it. This displays a "Select Resource..." dialog box; because we're defining our first (and only) argument to pass to the new mmddyy2ISO8601 function, click sp:arg1 on the right panel and then the OK button.

  3. Click the OK button to finish with the "Create from SPIN template" dialog box, and you'll see that the spin:constraint field of the class form for your new mmddyy2ISO8601 function has been filled out.

  4. All that remains is to define the function body. Click the spin:body widget on the class form and select Add empty row.

  5. Enter the following as the body:

    SELECT ?x
    WHERE {
    LET (?x := smf:parseDate(?arg1, "MM/dd/yy")) .
    }

The body of this function uses ?x as the variable name, but you can use any name you want. If you have more than one variable, and it binds to more than one value, the function will return the first value of the first variable, so there's no point in naming more than one variable after the SELECT keyword.

Note how, in this SPARQL query, the first argument to the smf:parseDate() function is arg1, which we defined on the spin:constraint part of the form earlier.

Your new functions should be all ready. Test it by entering and executing the following in the SPARQL view:

SELECT ?x
WHERE {
LET (?x := :mmddyy2ISO8601("9/6/09")).
}

When you make calls to your own functions, don't forget the colon at the beginning of the function call and, if your function was not defined in the default namespace, the namespace prefix before that. All function calls are in a particular namespace (for example, parseDate() is in the namespace represented by the smf prefix), and your new mmddyy2ISO8601() function is in the default namespace for this project. For production application development, it's better to identify the function's namespace with a specific prefix, because it will be easier to import the code into another file without confusion.

mmddyy2ISO8601() is now a function that you can call anywhere, including from the body of new functions that you create. Test it further in the SPARQL view by passing other dates as a parameter.

This is a blog by TopQuadrant, developers of the TopBraid Suite, created to support the pursuit of our ongoing mission - to explode strange semantic myths, to seek out new models that support a new generation of dynamic business applications, to boldly integrate data that no one has integrated before.