An updated version of this blog post is now available as a chapter in the TopBraid Application Development Quickstart Guide (pdf).
TopBraid Ensemble (TBE) is a Flex-based web application for assembling and displaying TopBraid applications. The user interface runs on web browsers with Adobe Flash installed. When developing applications, the data behind the application is hosted by the TopBraid Live Personal Server included with TopBraid Composer Maestro Edition (TBC-ME); applications can then be deployed for multi-user use on a server running the TopBraid Live Enterprise Server product.
Today we're going to see how to use TBE to create an editor that lets an end user edit a thesaurus using the SKOS vocabulary management ontology. This exercise is excerpted from the TopBraid Ensemble Application Development and Reference Guide (pdf), which you can download and use to find more detailed background on TBE's features and architecture.
TopBraid Ensemble: the basics
TBE lets developers quickly configure applications around semantic web models by:
-
Assembling pre-packaged graphical user interface components such as search forms and tree-based displays into desired configurations that let the end user view or edit data
-
Adding custom business actions through SPARQLMotion scripts
-
Building and using new custom components
Once the application developer designs forms and event logic around a data model and deploys this TBE application on a server running the Enterprise edition of TopBraid Live, the developer's end users can use this application with any web browser that supports Adobe Flash.
The nine user interface component types offered in release 3.2 include trees, grids, forms and maps. A developer can arrange these across multiple pages that function like a tabbed interface to reduce the clutter than can result from squeezing too much onto a single screen.
Each UI component can:
-
Contain one or more widgets that can display or provide an edit mode for information from the connected information source
-
Include its own menu actions and icons
-
Broadcast events to other components and listen for and react to events broadcast by other components
TBE also provides non-UI, or invisible components, which work behind the scenes to perform data transformation and to relay events.
A developer designs one or more input screens with TBE components and specifies the data graph that it will work with. These applications can call SPARQLMotion scripts, combining sophisticated back-end triples processing with quick development of application user interfaces to create powerful, intuitive semantic web applications.
Creating an application consists of four basic steps:
-
Select whether you want to begin with a New Application or a Default Application
-
Identify the data to use with your application
-
Select and configure the components to go on your screens
-
Test your application
Starting with a New Application means starting with a blank form and then adding and configuring the components that you need. This is especially useful for experienced TBE developers creating simple applications. New TBE developers often find it easier to begin with a Default Application, which includes several components arranged in a default layout that you can modify by deleting, adding, moving, and reconfiguring the components.
The following shows a Default Application before any modifications have been made, with kennedyfamily.owl specified as the data to use with it:
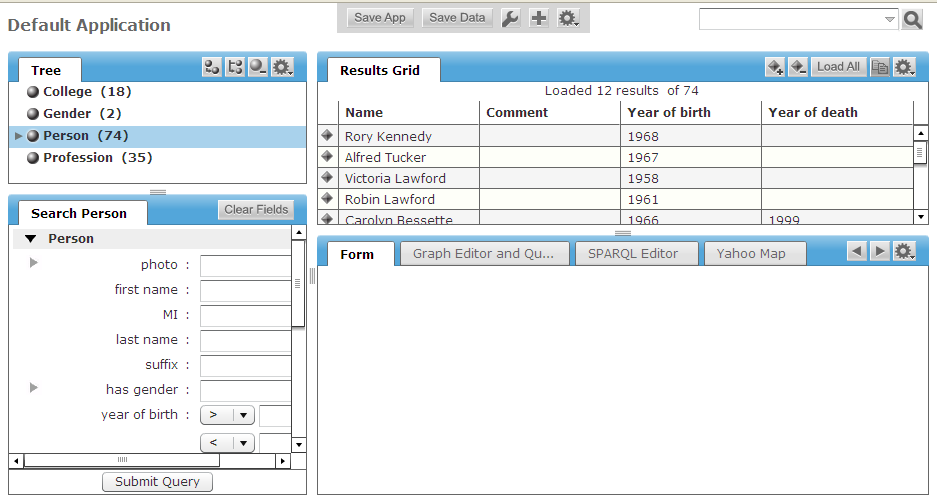
A configured TBE application specifies what components are shown when it is launched, how components are arranged, and how they interact with each other. Each application also defines what data to use with it. Some applications, such as the default apps and the new app, are configured to work with any data. Other applications are configured to work with specific datasets.
When creating a TBE application, components can be rearranged, resized, removed and added. For example, you can have have two Results Grid components on the screen instead of one, like the default applications have. You can also customize the menu options for each component and the way the components interact with each other.
TopBraid Ensemble's Default configurations are general TBE applications included in your installation. These configurations include most of the built-in components, laid out and wired for interaction with each other so that when an event such as a resource selection happens in one component, information displayed in some of the other components changes. For example, when you select a class in the tree, the members of the class appear in the grid, and when you select a resource in the grid, it populates the form with information about that resource.
You can learn a lot about the potential power of these forms by studying how the components in the default configurations generate and listen to the events that make this kind of component interaction possible.
Creating the sample application
Our sample SKOS thesaurus editing application will have only two components:
-
A tree displaying resources connected by skos:broader property.
-
A form showing details of each resource. When the end-user clicks a node of the tree or a class name on the form, the form will refresh to display all the details about that class.
TBE applications typically work with ontologies created using TBC, so before creating our TBE app, we need to create the data model.
Step 1: Create Ontology
In TBC, create a new RDF/OWL file called thes1 and import skos-core.rdf from the Common folder of the TopBraid library into your new model. Create an instance of skos:Concept (a subclass of owl:Thing) in this model and call it Taxonomy Root. Remember which project it's stored in; we will need it as a root resource for the tree created on your TBE form.
Save your work.
Step 2: Create New Application
To get started with developing and configuring a TBE application, first send your browser to the TopBraid Suite Console, which can be accessed at http://localhost:8083/tbl when running the TopBraid Live Personal Server included with TBC Maestro Edition. This will take you to the TopBraid Administration Console.
In the TBS Administration Console, select "New Application".
On the "Data Graphs Compatible With New Application" screen, select the thes1 model that you just created from the project where it was stored.
Step 3: Select Components
In TBE, click the plus sign icon and select Add Components to add each of two new components to the application: tree and form. Drag their tabs to lay them out side by side as shown in the following:
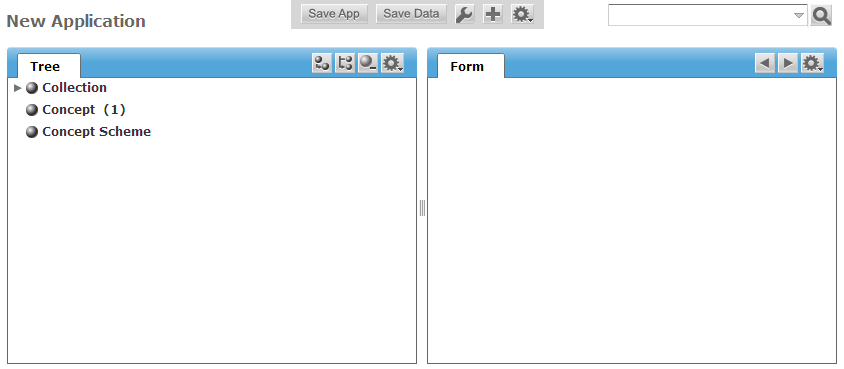
Note how the default configuration of the tree component is to show the class structure of the data model; you'll be reconfiguring it to show the tree of taxonomy terms being edited by your new application's end user.
Step 4: Configure Application
Launch the configuration console by clicking the wrench icon or pressing F2. You began with a copy of "New Application"; Click on "New Application" at the top of the navigation pane on the left, and then under General on the right change the application label to be "SKOS Editor". (Hover to the left of the existing value and click the "edit" button that appears there to change the value. )
Step 5: Configure Tree
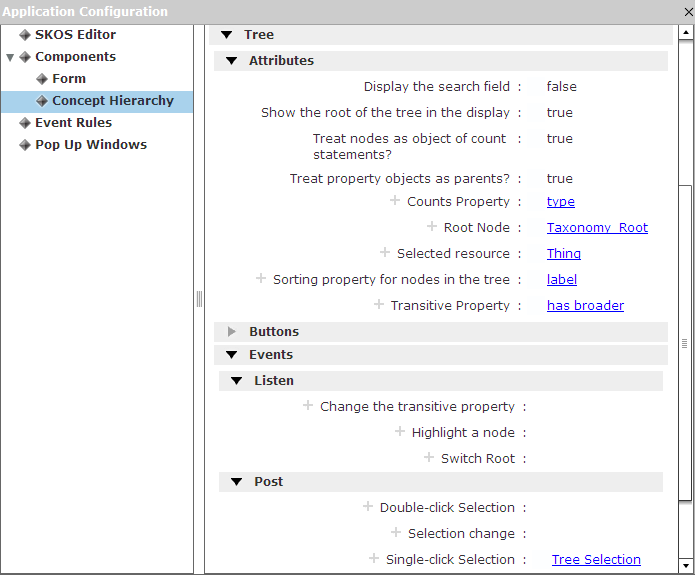
Now click on the Tree component on the left side of the Application Configuration console (you may need to first click the Components node of the tree to expand it into a list of available components) and make the following modifications:
-
Rename the Tree's label to read Concept Hierarchy.
-
Under Tree/Attributes, change the "Show the root of the tree in the display" setting to true.
-
Change the Root Node to the Taxonomy Root (the new resource you created in TBC).
-
Change the Transitive Property that identifies tree node child/parent relationships to "has broader" (the label assigned to the skos:broader property).
-
Under Events, create a new Post Event for Single-click Selection and call it Tree Selection.
Your configuration should look similar to the one shown here:
Step 6: Configure Form
Now select the Form component on the left of the Application Configuration console and make the following modifications:
-
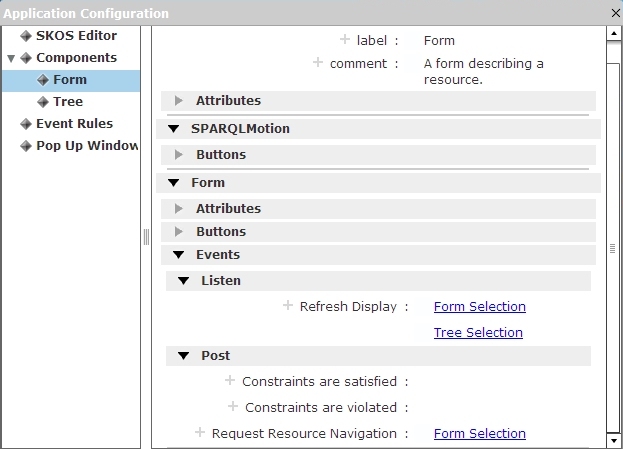
Wire the Form to listen to the Tree Selection event. Click on Add existing entry next to Refresh Display (Listen Event) and start typing "Tree". When "Tree Selection" shows up in the drop down, select it and click OK.
-
Create a new Post Event for the Request Resource Navigation listener. Call it Form Selection.
-
The form is already configured to refresh when the end user clicks on a tree node, which sends a Tree Selection event. You also want the form to refresh if the end user clicks on the name of a concept on the currently displayed form. For example, if the form for the concept Sparrow shows that Sparrow's broader term is Bird, and the end user clicks on Bird, you want it to display data for the concept Bird. Click on Add existing entry next to the Refresh Display listen even and start typing Form. When "Form Selection" shows up in the drop down list, select it. It will join Tree Selection as the second value for the Tree's Refresh Display listen event.
Your configuration should look similar to the one shown here:
Step 7: Test and Save
Your new application is done.
You can close the configuration console by clicking the X at the upper right and test your new application by creating new nodes in the tree with the buttons in the upper-right of the tree component and entering additional information in the forms as shown here:
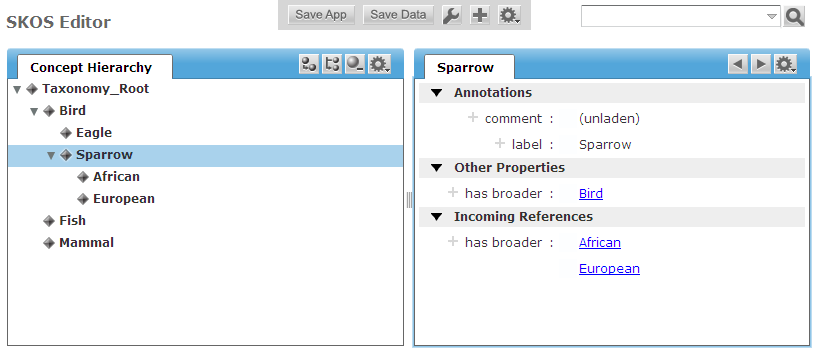
As you add and select nodes in the Concept Hierarchy, the tab title and many of the fields in the form on the right will update automatically to provide information about the selected tree node.
To save your application, click the Save App button. On the Save Application As dialog box, enter new values for Application Name and Application Base URI. (If this is not the first time you've saved this application, you'll also want to click the Overwrite check box.) The next time you go to the TopBraid Suite Console, you'll see your new application listed where you earlier saw New Application, Default Application, and the other choices.
To save the data you've created using your new editor, such as the bird information shown in the screen shots, you or your application's end users would click the Save Data button.
Applications like this can be hosted on the TopBraid Live server, where any users with browser access to that server can run your application and browse and edit the data you choose to make available. They don't need TopBraid Composer, and they don't need to know about RDF or any data modeling issues; they only need to know how to use the graphical, interactive application that you design for them using TopBraid Ensemble.
So far, we've only seen a small part of what a TBE application can do for your end users. Take a look at the TopBraid Ensemble Application Development and Reference Guide (pdf) to learn more.


0 comments:
Post a Comment