
An updated version of this blog post is now available as a chapter in the TopBraid Application Development Quickstart Guide (pdf).
XML-based tools form the plumbing of modern electronic publishing systems, so when your semantic web application can create XML, it can easily feed content into one of these systems. The W3C standard XSLT is the most popular tool for converting one kind of XML into another, so in this posting we'll see how SPARQLMotion scripts can use XSLT to create customized XML from your triples. (TopBraid Suite is also very good at reading XML; see the TopBraid Composer help panel "Creating, Importing, Querying, Saving XML documents with Semantic XML" for more on this.) Our example script will save its output as an XHTML file, but you can create XML conforming to any DTD or schema you like and save it as a file or return it via a web service.Creating XML
TopBraid offers several ways to create XML. The Semantic XML feature lets you read arbitrary XML and gives you fine-grained control over XML that you create, but for a quick conversion of data to XML, there are simpler options. The W3C's RDF/XML serialization standard is the most well-known (if not the most popular) format for representing triples in XML, but its flexibility in the representation of triples can add complexity to the XSLT stylesheet, which must account for several possible locations of a given triple's subject, predicate, and object in various combinations of XML elements and attributes.
The simplest, most straightforward XML format that a semantic web application can create is the W3C standard SPARQL Query Results XML Format. For example, with the following query against the kennedys.owl file included with TopBraid Composer,
PREFIX k: <http://topbraid.org/examples/kennedys#>
SELECT ?last ?first ?birth
WHERE {
?s k:lastName ?last .
?s k:firstName ?first .
?s k:birthYear ?birth .
}
ORDER BY (?birth)
the XML representation of the result will have the following structure, with a head element listing the variables followed by a results element that contains a result child for each row of results returned by the SPARQL engine:
As we'll see, a very brief XSLT stylesheet can handle this.
<sparql xmlns="http://www.w3.org/2005/sparql-results#">
<head>
<variable name="last"/>
<variable name="first"/>
<variable name="birth"/>
</head>
<results>
<result>
  <binding name="last">
    <literal>Kennedy</literal>
  </binding>
  <binding name="first">
    <literal>Joseph</literal>
  </binding>
  <binding name="birth">
    <literal datatype="http://www.w3.org/2001/XMLSchema#integer">1888</literal>
  </binding>
</result>
<result>
  <binding name="last">
    <literal>Fitzgerald</literal>
  </binding>
  <binding name="first">
    <literal>Rose</literal>
  </binding>
  <binding name="birth">
    <literal datatype="http://www.w3.org/2001/XMLSchema#integer">1890</literal>
  </binding>
</result>
<!-- more result elements -->
</results>
</sparql>
Creating an XML version of SPARQL query results in a SPARQLMotion script
In our sample application, the XSLT stylesheet will create an XHTML version of the data returned by the query above.
Start by creating a SPARQLMotion File in TopBraid Composer file called xsltdemo. Create a SPARQLMotion script in this file with an ImportRDFFromWorkspace initial module named GetKennedyData, and set its sml:sourceFilePath property to /TopBraid/Examples/kennedys.owl. (For more details on following these steps, see How to: create and run a SPARQLMotion script.)
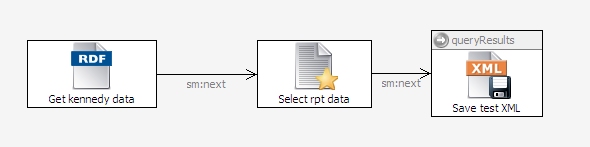
For your script's second module, drag a SerializeSPARQLResults module from the SPARQLMotion palette's Text Processing section onto the workspace and name it SelectRptData. Set the following three properties to configure it:
Set its sml:selectQuery property to the SPARQL query shown above.
Set sm:outputVariable, a property that names the variable that will hold the results of the query, to queryResults.
For the sml:serialization property, click the white triangle to display the context menu and select Add Existing, because you want to pick from the predefined list of legal values. On the Add existing dialog box, select sm:XML on the right. (If you click on sml:RDFSerialization on the left of this dialog box, you'll see that this module can also output N3, NTriples, RDF/XML, and Turtle RDF.)
Close the Edit SelectRptData dialog box and connect the GetKennedyData module's icon to the SelectRptData one.
When you develop an XSLT stylesheet, you want some sample input XML data handy to test it, so let's have this script create a file for this. Add an Export to XML File icon from the Export to Local section of the palette and call it SaveTestXML. Set its sml:xml property to {?queryResults} to get the data that your SelectRptData module stored in this variable, and set sml:targetFilePath to testdata.xml. That's all you need to set, so connect your SelectRptData icon to it as shown here:
Select that third icon and click the debug icon at the top of the SPARQLMotion workspace to run it, and you should see a testdata.xml file appear in the same directory as your script. This file will have XML that follows the structure of the example shown above.
Applying an XSLT stylesheet in a SPARQLMotion script
First, you need to create the XSLT stylesheet file. If you're using an Eclipse-based XML editor such as oXygen or XML Spy, go ahead and use one of those editors. Otherwise, after selecting the folder in the Navigator view where you want to store the file, pick New from the File menu. Because you're not creating one of the specialized files that TopBraid Composer typically deals with, pick Other from the cascade menu. Pick XML from the XML section of the New dialog box and click next. Call the file createKennedyHTMLRpt.xsl, and click Finish on the New XML File dialog box. (Clicking Next on that dialog would lead to wizards that make the process more complicated than this example requires.) Paste the following stylesheet, which I wrote to process the testdata.xml file created above, onto the editor and save the stylesheet:
(If you create the stylesheet outside of TopBraid Composer, make sure to put it in the same folder as your script, then right-click the folder's icon in the Navigator view and select Refresh so that Eclipse knows that the new file is there.) The stylesheet converts the XML into an XHTML file with a table that has a row for each row of the result set.
<xsl:stylesheet version="1.0"
    xmlns:xsl="http://www.w3.org/1999/XSL/Transform"
    xmlns:sp="http://www.w3.org/2005/sparql-results#"
    xmlns="http://www.w3.org/1999/xhtml">

<xsl:template match="sp:sparql">
  <html>
    <head><title>XSLT demo</title></head>
    <body>
      <table border="1">
        <tr>
          <th>Last Name</th>
          <th>First Name</th>
          <th>Birth</th>
        </tr>
        <xsl:apply-templates/>
      </table>
    </body>
  </html>
</xsl:template>

<xsl:template match="sp:result">
  <tr>
    <td><xsl:value-of select="sp:binding[@name='last']"/></td>
    <td><xsl:value-of select="sp:binding[@name='first']"/></td>
    <td><xsl:value-of select="sp:binding[@name='birth']"/></td>
  </tr>
</xsl:template>

</xsl:stylesheet>
The next module to add to the SPARQLMotions script is the one that applies the stylesheet to the XML. Drag a Convert XML by XSLT module from the XML Processing section of the palette, name it CreateHTML, and configure it by setting the following three properties:
Set sm:outputVariable to HTMLResult. This variable will store the result of the XSLT transformation.
Set sml:template to {?stylesheet}. We haven't added the script module that sets this variable yet, but will soon.
Set xml:xml to {?queryResults}. As we saw above, the SelectRptData module stores the XML of the query results in this variable; the SaveTestXML module also used the contents of this variable.
Connect the SelectRptData module to your new CreateHTMLRpt module. SelectRptData is already connected to SaveTestXML, but sending a module's output to multiple modules is a common technique in SPARQLMotion scripts.
To read the createKennedyHTMLRpt.xsl stylesheet disk file and send its contents to the CreateHTMLRpt module for use in the XSLT transformation, drag an ImportTextFile module from the Import from Local section of the palette and name it ReadXSLTStylesheet. Tell it where to find the stylesheet file by setting its sml:sourceFilePath property to createKennedyHTMLRpt.xsl, and then set its sm:outputVariable property to stylesheet—the variable that the CreateHTMLRpt module will expect to find the text of the stylesheet that it applies to the output of the SelectRptData module. Connect the ReadXSLTStylesheet module to the CreateHTMLRpt module.
The last module will save the results of the XSLT transformation in a disk file. Drag another ExportToXMLFile module from the Export to Local section of the palette and name it SaveHTMLFile. Set its sml:xml property to {?HTMLResult} so that it reads the variable set by the CreateHTML module, and then indicate where to save this variable's value by setting the module's sml:targetFilePath property to KennedyRpt.html. Connect the CreateHTML module to the new SaveHTMLFile module. Your completed script should look something like this:
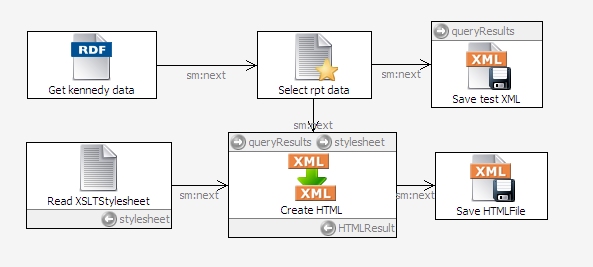
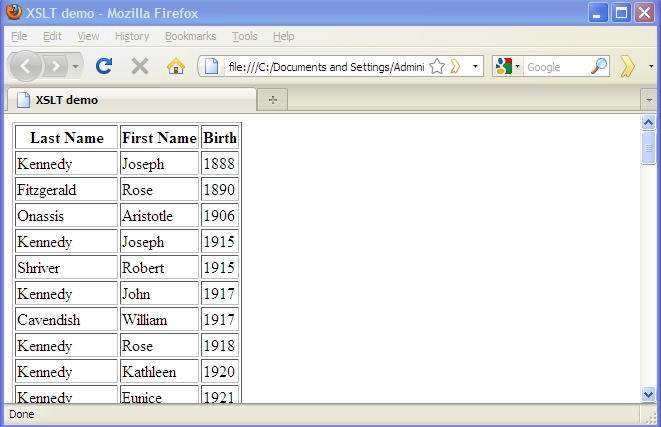
To test it, select the CreateHTML icon and click the debug icon. You should see a KennedyRpt.html file appear in the same directory as your xsltdemo script; in a browser, this HTML file will look like this:
Now that the script is applying the XSLT stylesheet to the XML and creating the HTML, you can right-click your SaveTestXML script module and select Delete to remove it from your script if you want to, but maybe you don't want to—if you ever need to refine the SELECT query in the SelectRptData module or the XSLT stylesheet that the ReadXSLTStylesheet module feeds to the CreateHTML module, the ability to create another disk file of test data may prove handy in the future.
This also demonstrates another technique of sophisticated SPARQLMotion scripts: the ability to share common processing modules for different output modules. You essentially have two SPARQLMotion scripts here—SaveTestXML and SaveHTMLFile—which share several modules. That's why, when you pick Edit SPARQLMotion Script or Execute SPARQLMotion Modules from the Scripts menu, you'll see these two "scripts" listed as choices, even though they're graphically represented as a single flow chart with a choice of end points.
Taking it further
If you had created this script as a web service, then instead of ending with an Export to XML File module from the Export to Local section of the palette, you could route the XML from the Convert XML by XSLT module to a Return XML module from the Export to Remote section of the palette. (Or, that could be a third endpoint added to the two discussed above!) If you set the Return XML module's sml:mimetype property to text/html and had it return XHTML like the xsltdemo script above does, you'd be setting up the dynamic creation of a web page, so that users browsing to the URL that invokes the service would think that they were just linking to a web page.
Of course, it doesn't have to return HTML. It can return anything that an XSLT script can create, and you can set sml:mimetype to any valid HTTP MIME type, and any application that can do an HTTP GET can request delivery of this data, which opens up a wide range of possibilities for the contributions that this application can make to a larger system.


0 comments:
Post a Comment